")
Innehållsförteckning:
- Steg 1: FÖRBERED HJULEN
- Steg 2: Fäst motorerna i chassin (bilkropp)
- Steg 3: Fäst hjulen på motorerna
- Steg 4: KABLA UPP MOTORERNA TILL MOTORFÖRAREN
- Steg 5: ANSLUT MOTORDRIVEREN TILL ARDUINO
- Steg 6: STRÖMFÖRSÖRJNING FÖR MOTORER
- Steg 7: ANSLUT BLUETOOTH
- Steg 8: Ladda upp koden
- Steg 9: BLUETOOTH -APP
- Steg 10: GRATTIS !
- Författare John Day day@howwhatproduce.com.
- Public 2024-01-30 12:46.
- Senast ändrad 2025-01-23 15:11.

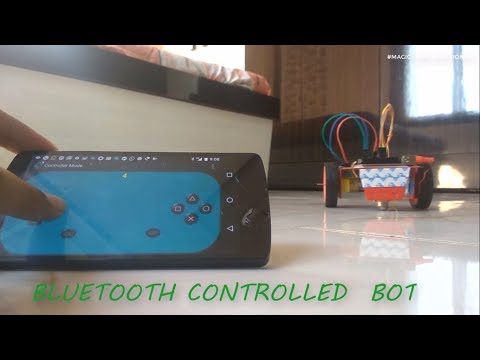
I DENNA INSTRUKTIBEL SKA jag visa hur man gör en enkel botten som styrs av din smarttelefon via bluetooth
Nödvändiga delar:
☻ARDUINO
☻2X växelmotorer
☻HC-05 BLUETOOTH-MODUL
☻LAPTOP ELLER PC (FÖR UPPLADNING AV KOD TILL ARDUINO
☻KRAFTFÖRSÖRJNING (JAG ANVÄNDDE EN STRÖMBANK FÖR ATT SPARA BATTERIER)
☻ Hopptrådar
☻HJUL
ASSCHASSIS (BILKROPP)
Steg 1: FÖRBERED HJULEN


Jag gick med i två hjul tillsammans för att göra ett brett hjul som visat för att få mer stabilitet
FÖR EXTRA STABILITET ANVÄND JAG SUPER LIM OCH BORTTAGET EXTRA LIM MED ACETONE
Steg 2: Fäst motorerna i chassin (bilkropp)
")
")
")
")
FÖRSTA SÄLJARE Två hopptrådar till var och en av motorerna så som visas
NÄSTA, FASTA MOTORERNA TILL CHASSIEN ANVÄNDNINGSBOLT.
Steg 3: Fäst hjulen på motorerna


TRYCK OCH Vrid lite för att fästa på hjulen på motorn
Steg 4: KABLA UPP MOTORERNA TILL MOTORFÖRAREN


GÅ MED I DE 4 KABLARNA FRÅN MOTOREN TILL VARJE AV MOTORFÖRARENS 4 UTGÅNGAR.
Steg 5: ANSLUT MOTORDRIVEREN TILL ARDUINO


ANSLUT VARJE AV DE 4 INGÅNGARNA I MOTORFÖRDRIVAREN TILL PIN 8, 9, 10, 11 RESPEKTIVT FÖR ARDUINO UNO
Steg 6: STRÖMFÖRSÖRJNING FÖR MOTORER


JAG ANVÄNDE EN USB FÖR ATT LEVERA STRÖM TILL MIN BOT
ENKEL STRIP AV DET GRATIS AVSLUTET AV USBEN OCH TA BORT INSOLERINGEN FÖR ATT AVSIKTA 4 TRÅDAR.
HÅLL SVART OCH RÖD TRÅD OCH KLIPP AV DE ANDRA TVÅ TRÅDARNA.
GÅ MED RÖD TILL + OCH SVART TILL NEGATIV FÖR MOTORFÖRARENS STRÖMFÖRSÖRJNING.
Steg 7: ANSLUT BLUETOOTH


ANSLUT BLUETOOTH-ENHETEN HC-05 TILL ARDUINO:
anslut rx av bluetooth till tx av arduino
anslut tx av bluetooth till rx av arduino
vcc till +5v
gnd till gnd
Steg 8: Ladda upp koden

Öppna koden med nedanstående länk och ladda upp till ARDUINO
LÄNK: https://drive.google.com/open? Id = 1LFiq5kcdtwzrAfNUjZtbnxqNwQx4e9pM
OBS: Ta bort TX- och R -PIN -koden för BLUETOOTH Innan du laddar upp koden
Steg 9: BLUETOOTH -APP


☻Hämta Arduino Bluetooth -kontroller från Play Store
Klicka på Anslut och välj din Bluetooth -enhet.
☻öppna styrläget och klicka på set -kommandon från sidomenyn
Ställ in värdena som
upp-1
ned-2
vänster-3
höger-4
OBS: DU KAN BEHÖVA GÖRA ETT LÅTT PROV OCH FEL OCH ÄNDRA KONFIGURATIONEN AV KODEN ELLER MOTORN LITT FÖR ATT FÅ ÖNSKADE RESULTAT
Steg 10: GRATTIS !

DU HAR BARA SLUTAT ATT GÖRA BOTEN
NU KAN DU KONTROLLERA BOTEN FRÅN DIN TELEFON.